

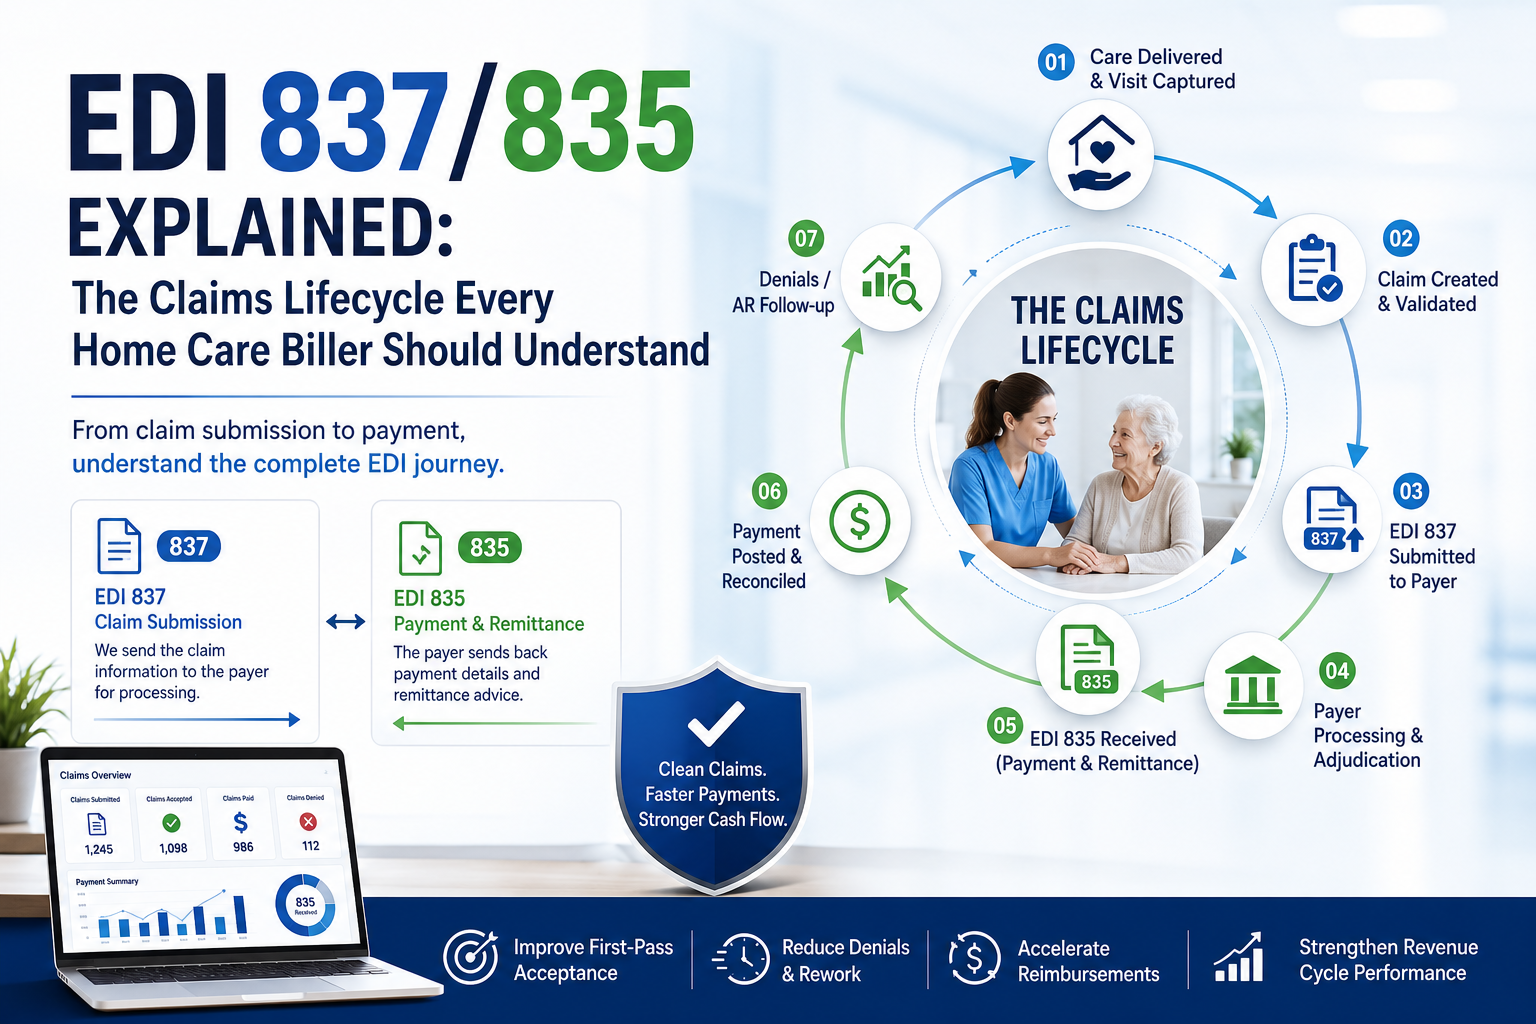
For home care agencies, billing is much more than creating and submitting a claim.
Behind every successful reimbursement is a sequence of electronic transactions connecting the agency, billing system, clearinghouse, payer, and payment process.
Two transactions sit at the center of this process:
EDI 837 — Claim Submission
EDI 835 — Payment and Remittance
The 837 moves claim information from the provider toward the payer. The 835 brings payment and remittance information back.
For an experienced home care biller, understanding these transactions is important because they provide visibility into the complete journey of a claim—from the original visit to the final payment or denial.
What Are EDI 837 and 835?
At the simplest level:
837 = What the provider is billing
The 837 is the electronic healthcare claim transaction used to send claim information to a payer.
It can contain information such as:
- Patient or member information
- Billing provider information
- Rendering provider information
- Dates of service
- Procedure or service codes
- Modifiers
- Units
- Charges
- Diagnosis information
- Authorization information
For professional healthcare services, the 837P transaction is commonly used.
835 = What the payer did with the claim
The 835, commonly referred to as an Electronic Remittance Advice (ERA), communicates payment and remittance information back to the provider.
It can explain:
- What was paid
- What was adjusted
- What was denied
- What amount remains
- Why an amount was adjusted
- Patient or provider responsibility
- Other payment-related information
A simple way to remember the relationship is:
837 sends the claim. 835 explains the financial outcome.
The two transactions are therefore connected parts of the same revenue cycle.
The Complete Home Care Claims Lifecycle
A typical electronic claims lifecycle looks like this:
Care Delivered → Visit Data → Claim Creation → Validation → 837 Submission → Payer Adjudication → 835 Remittance → Payment Posting → Denial/AR Follow-up
The important point is that the lifecycle begins before the 837 and continues after the 835.
An error introduced during visit documentation can eventually become a claim rejection, denial, adjustment, or delayed payment.
That is why experienced billing teams look at the entire lifecycle rather than treating claim submission and payment posting as separate activities.
Step 1: Care Is Delivered and Visit Data Is Captured
The billing process starts with the actual service.
A caregiver completes a scheduled visit, and the agency captures the information needed to support billing.
Depending on the payer and state, this may include:
- Patient/member information
- Caregiver information
- Date of service
- Start and end time
- Service type
- Units
- EVV information
- Authorization
- Visit documentation
For Medicaid home care, Electronic Visit Verification (EVV) can be particularly important because the claim may need to align with the underlying visit information.
This creates one of the most important principles in healthcare billing:
A clean claim starts with accurate source data.
If the visit information is incomplete or incorrect, the billing system may generate an inaccurate claim even if the EDI file itself is technically valid.
Step 2: Claim Creation and Validation
Once the required visit and patient information is available, the billing system creates the claim.
The claim needs to accurately represent the service that was delivered and meet the applicable payer requirements.
Before submission, billing teams should validate areas such as:
Patient and payer information
- Correct member ID
- Correct payer
- Accurate demographic information
- Appropriate coverage
Provider information
- Correct billing provider
- Correct rendering provider
- Required provider identifiers
- Appropriate enrollment
Service information
- Correct procedure codes
- Correct modifiers
- Accurate units
- Correct service dates
- Appropriate diagnosis information
Authorization
- Authorization exists
- Authorization is active
- Service falls within the approved period
- Billed units do not exceed authorization
EVV and visit information
- Visit exists
- Service information matches
- Required EVV information is available
- Billed units align with the visit
Payer-specific rules
- Required fields are present
- State-specific requirements are satisfied
- Payer-specific billing rules are followed
This pre-submission validation is one of the strongest opportunities to prevent avoidable claim problems.
Step 3: The 837 Is Submitted
After validation, the claim is converted into the appropriate electronic format and submitted.
In many healthcare billing environments, the claim follows this path:
Home Care Agency → Billing System → Clearinghouse → Payer
The clearinghouse acts as an intermediary between the provider and payer and can perform various validation and routing functions.
This stage is important because a claim can fail before it ever reaches payer adjudication.
For example, an electronic claim may contain:
- Missing required information
- Invalid data
- Incorrect formatting
- Invalid identifiers
- Structural EDI problems
These issues can result in a rejection.
Rejection vs. Denial: Why the Difference Matters
One of the most important concepts for billing teams is understanding that a rejection and a denial are not the same thing.
Rejection
A rejection generally occurs when a claim fails an electronic, formatting, or front-end requirement.
The claim may not have entered full payer adjudication.
The typical response is:
Identify → Correct → Resubmit
Denial
A denial generally occurs when the payer processes the claim and determines that the service is not payable, either fully or partially.
The response may require:
Review → Determine cause → Correct/appeal → Resubmit or follow up
This distinction matters because the workflow is different.
A billing team that treats every rejected or denied claim the same way can create unnecessary rework.
Step 4: Payer Adjudication
Once the claim is accepted for processing, the payer evaluates it according to its rules.
This process is commonly referred to as adjudication.
The payer may evaluate:
- Member eligibility
- Benefits
- Provider participation
- Authorization
- Service coverage
- Procedure and diagnosis information
- Units
- Contractual rules
- Coordination of benefits
- Payer-specific requirements
The claim may ultimately be:
- Paid
- Partially paid
- Denied
- Adjusted
- Held for additional information
This is an important point:
An accepted 837 does not guarantee payment.
Passing initial electronic validation only means the claim was accepted into the next stage of the process. The payer still needs to determine whether the claim is payable.
Step 5: The 835 Comes Back
After adjudication, the payer sends payment and remittance information.
This is where the 835 becomes critical.
The 835 helps the billing team understand the financial result of the claim.
It can provide information about:
- Amount billed
- Amount paid
- Adjustments
- Denials
- Patient responsibility
- Provider-level adjustments
- Claim-level adjustments
- Service-line adjustments
For example, a claim may have:
Billed: $1,000
Allowed: $800
Paid: $700
Adjusted: $200
Remaining amount: $100
The billing team needs to understand not only that $700 was received, but why the remaining amount was not paid.
That information is essential for accurate payment posting and AR management.
Understanding CARC and RARC
Two important code sets appear in electronic remittance information:
CARC — Claim Adjustment Reason Code
CARCs explain why an adjustment was made to a claim or service line.
RARC — Remittance Advice Remark Code
RARCs provide additional information or clarification about the adjustment or payment.
For billing teams, these codes should not be treated simply as technical EDI fields.
They can provide valuable insight into recurring billing problems.
For example, repeated adjustment or denial reasons may indicate:
- Authorization issues
- Eligibility problems
- Incorrect coding
- Missing information
- Incorrect units
- Documentation problems
- Payer-specific billing issues
This makes the 835 useful not only for posting payments, but also for improving future claims.
Step 6: Payment Posting and Reconciliation
Once the 835 is received, the payment and adjustment information needs to be posted to the appropriate claims.
A well-designed billing workflow should connect:
837 Claim → Payer Processing → 835 Remittance → Payment Posting
The billing team should be able to reconcile:
- Amount billed
- Amount allowed
- Amount paid
- Adjustments
- Remaining balance
- Denial reason
Manual payment posting can become a major administrative burden for agencies with high claim volumes.
Automated 835 processing can help reduce repetitive work and improve consistency.
However, automation should not mean simply posting whatever the payer returns.
The system should also identify exceptions that require human review.
Step 7: Denials and AR Follow-Up
Not every claim results in full payment.
When a claim is denied, underpaid, or partially paid, the billing team needs to determine what happened and what action is required.
A strong workflow should connect the financial result back to the original claim.
Ideally, the team should be able to trace:
Visit → Claim → 837 → Payer → 835 → Adjustment/Denial → Corrective Action
For example, if a claim is denied because the billed units exceed the authorization, the billing team should be able to identify:
- The original visit
- The authorization
- The units billed
- The payer response
- The denial reason
Without this traceability, staff may need to search across multiple systems before they can even identify the root cause.
Why Traceability Matters
A mature revenue cycle should be able to answer four questions about every claim:
1. What was delivered?
What service did the caregiver provide?
2. What was submitted?
What information was included in the 837?
3. What did the payer decide?
What happened during adjudication?
4. What happened financially?
What did the 835 report, and what remains unresolved?
This level of visibility helps billing teams move from reactive claim processing to proactive revenue management.
Common EDI Challenges for Home Care Agencies
1. Treating technical acceptance as payment approval
A claim may pass clearinghouse edits and still be denied by the payer.
Better approach: Monitor the claim through adjudication and payment.
2. Manually reviewing every 835
Manual remittance processing can consume significant staff time.
Better approach: Automate routine payment posting and route exceptions for review.
3. Repeated denial reasons
If the same denial appears repeatedly, correcting each claim individually does not solve the underlying problem.
Better approach: Analyse denial trends and address the source issue.
4. Disconnected visit and billing data
When visit, EVV, authorization, and billing information live in separate systems, identifying errors becomes more difficult.
Better approach: Connect source data to the claim lifecycle.
5. Ignoring underpayments
A claim marked “paid” is not necessarily fully paid.
Better approach: Compare billed, allowed, paid, and adjusted amounts during reconciliation.
837 vs. 835: Quick Comparison
| EDI 837 | EDI 835 | |
| Purpose | Claim submission | Payment & remittance |
| Direction | Provider → Payer | Payer → Provider |
| Main function | Communicates what is being billed | Communicates what happened to the claim |
| Key information | Patient, provider, service, coding and billing data | Payment, adjustments, denials and responsibility |
| Revenue-cycle stage | Claim submission | Payment and reconciliation |
| Main question | “What are we billing?” | “How did the payer handle it?” |
The 837 and 835 should therefore be viewed as two connected sides of the same process.
What a Mature Home Care Billing Process Looks Like
An experienced billing operation does not wait until the 835 arrives to identify problems.
Instead, controls are built throughout the lifecycle.
Before submission
Validate
- Patient information
- Eligibility
- Authorization
- EVV
- Service dates
- Units
- Codes
- Modifiers
- Payer requirements
After submission
Monitor
- Clearinghouse responses
- Rejections
- Claim status
- Payer responses
After adjudication
Process
- 835 remittance
- Payment posting
- Adjustments
- Denials
- Underpayments
- AR follow-up
At the management level
Analyse
- First-pass acceptance
- Denial rate
- Top denial reasons
- Days in AR
- Underpayments
- Rework volume
- Payer trends
This creates a continuous revenue-cycle process rather than a collection of disconnected billing tasks.
Where Automation Makes a Difference
A traditional billing workflow may require staff to manually move through several steps:
- Review visit data
- Check authorization
- Create the claim
- Review the claim
- Submit the 837
- Monitor responses
- Receive the 835
- Post payment
- Review denials
- Follow up on AR
Modern RCM platforms can connect many of these activities.
A more efficient workflow looks like:
Data Capture → Validation → Claim Creation → 837 Submission → Response Processing → 835 Processing → Payment Posting → Denial Detection → AR Follow-Up
The objective is not simply to eliminate manual work.
The bigger objective is to identify revenue-impacting problems earlier and give billing teams the information needed to act quickly.
Why This Matters for Home Care Agencies
Home care billing is highly dependent on accurate service-level information.
A claim can depend on the relationship between:
- Caregiver activity
- Visit data
- EVV
- Authorization
- Service codes
- Units
- Payer rules
- State-specific Medicaid requirements
When these elements are disconnected, billing teams may only discover a problem after the payer responds.
That creates a reactive revenue cycle.
A stronger approach is:
Validate before submission.
Monitor after submission.
Process remittances automatically.
Analyse denials.
Use what you learn to prevent the next problem.
